"straddle" method involves straddling the goat backwards (stand over the top of the goat facing backwards) and raising the rear leg up just enough to bend the lower foot back. You must be very careful as the goat may struggle and can injure themselves if you lift the leg up to high or at an odd angle. You should practice lifting the foot up many times before you ever begin cutting. Very soon you will achieve a zone of comfort for yourself and the goat. One tip I might mention: keep your tools in your back pocket so you can easily reach for them or put them away. The less commotion you make with a goats foot in the air, the better.
My "elevated" method involves placing the goat on a work table or place that brings the goats feet up to you. The back of my flatbed truck works well for this. It is a good idea to have someone holding the goat for you or, if the goat is gentle enough, on a short leash eating hay or grain. The goat should be small enough to where you can wrap one arm around and lift the hoof to be trimmed while using the other hand to do the actual trimming. I prefer this method the most mainly because it places less strain on me having to stoop down. Everything is right about eye level and this really makes it convenient. TOP
DETERMINING THE AMOUNT TO TRIM
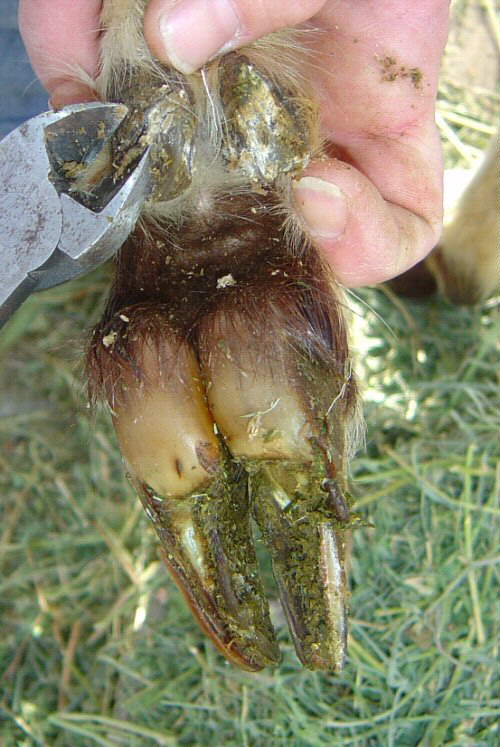
With the hoof raised in the air, your first job is to carefully inspect the hoof as in Picture 3, and clean any mud, manure, rot, debri and small stones from between the walls of the hoof. At this point, also make note of how the hoof looks for color and the smell of the hoof. A rotten smell is usually indicative of foot rot and should be treated accordingly.
Carefully using the curved portion of the hoof knife as shown in Picture 4, gently dislodge the debri and take note where the bottom of the foot is. Do not dig deep into this as it can cause injury. Just enough to clean the foot well. To do a really good job, one should consider having a spray bottle full of warm soapy water and disposable paper towels to spray and clean the area thoroughly before beginning to trim. The more of the hoof and foot you can see, the better the job you will be able to do. Note: in lieu of soapy water, a solution of bleach and water or iodine can be used. I sometimes use hydrogen peroxide to clean the area followed by a water rinse for very soiled hooves. When all is said and done, you will be able to see just how deep the walls of the hoof are and judge how much you will need to cut. Using this method, there will be no mistaking dirt and debri from hoof material.
How much to trim in my opinion really depends on the terrain and soil where your goats live. For softer or wetter soils, you can trim down each hoof wall to nearly flush with the pad of their foot. This will prevent debri and manure buildup between the walls which could lead to bacterial infection or foot rot. For soils that are harder, rockier or dry, I prefer to leave about 1/8" to 1/16" of the hoof wall intact, helping to raise the food pad just above the soil.
My personal preference is to start near the inside of the hoof as seen in Picture 5, and carefully work my way around the perimeter of the hoof as seen is Picture 6 and in Picture 7. You should only trim small amounts at a time and not large chunks.
TOP
While you are trimming each hoof, it is a good idea to check the dewclaw area, Picture 9 and trim away any dead or crusty hoof that may be present.
BE CONSERVATIVE, NOT AGGRESSIVE
It's a natural tendency to see your goats hooves and think they are very overgrown, and try to correct the growth in one trimming. Don't cut alot away all at once in one trimming or you'll end up with a goat that has sore feet. Correcting severe overgrowth might take several trimmings over a couple of weeks time. The best comparison I can give a person is cutting their fingernails. You know that real tender feeling you get if you cut to close? Now think of the goat who always applies pressure to its feet. That's how they feel. And when cut your fingernails too close and don't like that feeling, you don't have to walk on your fingers! Cut conservatively and not aggressively. There will always be another day that you can trim off a little more to bring the hoof back to proper form.
TOP
FOOT SCALD, FOOT ROT & FOUNDER
Foot Scald is termed as the onset of Foot Rot and is caused by improper levels of copper and sulfur in the diet. As the scald progresses into rot, you will smell a very foul odor and may also see a pus discharge from the hoof area. This condition needs to be treated as quickly as possible.
While there are a number of treatments used to correct foot scald and foot rot, perhaps the most common is to trim away the rotten part of the hoof, using care not to trim away good tissue. Scrub the area with a copper wash consisting of two tablespoons of copper sulfate and one tablesoon of vinegar mixed into one quart of water. You can apply copper sulfate powder directly to any lesions or scabs that exist and leave covered for at least 24 hours.
In addition to the above treatment, also prepare a solution of a half teaspoon of copper sulfate and one teaspoon of dolomite, mixed with two teaspoons of vitamin C powder. Give this mixture to the goat for two days. At this point, you should check all feeds given to the goat for the amount of copper contained as well as sulfur and adjust accordingly. If the amount of these minerals is not properly adjusted, the foot rot/foot scald condition will return.
Founder (often called laminitis) shows up as a sudden lameness where the feet are warm or hot to the touch. The causes for founder are basically low magnesium or a sudden intake of high protein (such as feed bin raids, sudden change in diet, etc.). Treatment basically entails giving the affected goat one to two tablespoons of Epsom Salts and adding dolomite to the feed. Once the mineral ration has been stabilized with a proper balance, founder should not be a problem.
TOP