So You're New To Goats (Part 2)
by Gary Pfalzbot
January 12, 2002 - (revised, March 7, 2015)
About the Author
By now you have probably finished planning and constructing your fence line system that will contain your goats. And you are now anxiously awaiting getting your first goats and turning them into their new home. At this point I am (or would be) just as excited as you. It's a point I've been at before and perhaps where I made a few mistakes along the way. While you are one step closer to begin raising goats, there are still a few more things that need attention before you get the green light. Let's take a good close look at shelters and just how one might go about setting up something that will provide a roof over your goats head.
Shelters
A goat shelter can be as elaborate or as minimal as you wish. In my travels, I've seen so many great ideas and different arrangements, that in reality, in hardly makes me an expert on goat shelters, but it has given me a keen insight into what works and what doesn't. From a simple lean to through a young childs playhouse that you can purchase at places like Lowe's or Home Depot, just about anything will work, or can be made to work, as long as your goats are kept dry and out of the wind and inclement weather. From the link found in the word shelter in this article, you can view a variety of shelter arrangements I've compiled from GoatWorld members and visitors over the years. Please feel free to add yours too!
Starting from the ground up, perhaps the most ideal arrangement would be a shelter built onto a slightly sloped concrete pad. Before I continue in this realm however, I want to point out that a concrete floor isn't the most ideal for the goats to rest upon without some type of bedding media. Any type of concrete floor should be constructed knowing that it will ultimately be covered with a layer of hay or straw to ensure the goats are not directly exposed to the concrete. Concrete has a tendency to drain the energy and warmth from whatever touches it. In some cases where a concrete floor remains in the shade during the hot summer sun, it remains cooler than the ambient temperature. But that is about the only time I can think of when it would actually offer some type of beneficial relief.
Just to be clear on the point of allowing goats to be in constant contact with a concrete floor, and this floor getting rather cold during the winter months, a person could construct a concrete floor that has a heating element built into it just below the surface. This is a fairly common practice in homes where tile flooring is used. Of course it is an added cost and only prudent if your budget allows it. This is why I'd simply recommend a concrete floor and the use of hay or straw as a bedding material. Whatever you use as the bedding, as long as the goats are not continually exposed to bare concrete flooring, they will be fine.
So you may be asking youself why I would recommend using concrete at all. Simply put - for ease of keeping it clean and durability. No matter what type of shelter you construct, you will need to periodically clean the shelter out to decrease a buildup in unwanted parasites and odors. And no matter how well you clean the shelter, goats will still soil the shelter no matter what. It is just in their nature and you cannot modify their behavior to be any different. This is why I would recommend using concrete instead of any other floor media such as plain dirt or wood. Scrub and clean as you may, you just won't get a wooden or earthen floor clean.
For sake of discussion, let's just say you can't use concrete and are only left with a dirt or wood floor option. Okay. Fair enough. In this case, dirt would be my second choice. If you have to choose wood, please keep in mind that in the end it is likely going to cost you a lot more to build the floor with wood than it is with concrete. Dirt on the other hand is cheap if not free. And it is pretty much in unlimited supply. When it comes to cleaning dirt, you will have to be more tenacious in your cleaning efforts, and from time to time actually add things such as hydrated lime (barn lime) to the soil to deter the soil from becoming a breeding ground for parasites. In some situations, where prudent and where allowed, if the shelter is portable, one could simply move the shelter and burn refuse over the area where the shelter was in place.
Locating a shelter to a nearby water and electrical source is imperative in my opinion. No matter what type of floor you decide upon, water is going to be helping in your cleaning ritual. I myself prefer a water hose and a high pressure water nozzle to do my cleaning. A small pressure washer that can be purchased and used is even better. But it too still needs a water and electrical source to power it. Of course a power source can be had in the way of a portable generator, but hey, while you are planning this out and probably not wanting to do this twice in your lifetime, give these issues some thought and planning. If you get a good start, both you and your goats will be better off for it.
Returning to the concrete floor idea, some of you may remember that I mentioned building a concrete floor with a slope to it (Figure 1). This planning can get somewhat complex here as there are many ways to go about it. One such plan would consist of making all the outer edges of the floor slope into a center point in the floor where a 4" drain would be placed, thus carrying out the water, cleaning agents, and refuse to a place well outside the shelter. This of course means raking out as much of the hay or straw bedding well before you begin cleaning with water. Trust me. Trying to force a bunch of hay or straw down the drain hole and then having to snake it out when it clogs isn't fun.

Figure 1
On this "sloped in" approach, in theory, all refuse and liquid wasted will be inclined to go towards the lowest point of the shelter which in this case, would be the drain hole. I use a 4" drain hole just as an example. I don't think I would recommend anything smaller than that. And for those concerned about having a hole in the concrete where the goats may get a leg caught in...that's why they make drain covers! I would definitely recommend a drain cover. This will keep unwanted critters (like snakes) from making their way up the drain hole. And a periodic flush of this drain will prevent them from setting up a home too.
Drains, snakes, critters...these probably have gotten a few thinking that they don't want to deal with that possibility, so the next idea is for you! The "sloped out" (Figure 2) approach doesn't require a drain in the shelter. This approach can be created a number of different ways. First consider that when you go in to clean, the refuse needs to travel someplace. If you pour your concrete floor with the back wall edge being higher than the rest of the floor, and the side wall edges being that high as well, but sloping lower towards let's say, the entrance, you'll have an easier time going in and working from high to low to push all the refuse out the entrance where it can be carted off later. There is a problem with this as you may have already noticed. You and the goats will have to travel through the area (entrance) where the refuse traveled.

Figure 2
The last option I will discuss here is perhaps the best option, or at the very least, as effective as the drain in the floor option. But it is going to require a bit more construction effort and ingenuity on your part. I call this the "peaked floor" option (Figure 3). From the very center of the floor, the floor slopes off to each side wall, right and left (not front to back) at an angle of perhaps 2 degrees. The outer edges of the concrete floor are built with a trough like shape where they can either be left in their natural concrete form, or a pipe cut in half lengthwise can be used. The floor itself is raked with a toothed trowel before the concrete sets up, and the grooves created carry water and liquids down the slope to the troughs on the outer edges. This keeps the refuse away from the entrance and carries the refuse outside the shelter where it can be dealt with accordingly. If you are having a hard time visualizing the raked floor approach, until I am able to provide better pictures or drawings, think of the texture of many boat ramps (Figure 4). They use a channel type, cross-hatch system all thoughout (better) boat ramps so the water returns to the lake or river. It also gives better traction for your boat or truck!
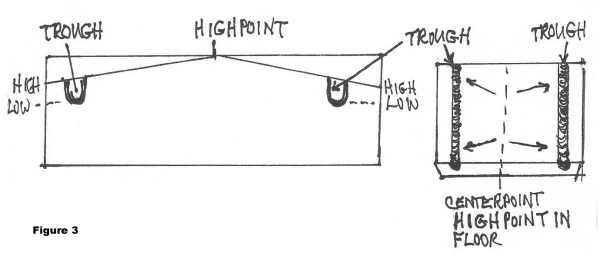
Figure 3
To recap the highlights in this article, consider the most important considerations for at least, the floor portion of your goat shelter. The type of floor to be used - concrete. The availability of water and power to the goat shelter. And finally, the ease of cleaning the goat shelter. I haven't touched upon anything other than the floor and the issues it presents. Before me proceed on, the final issue on the concrete floor would be rather or not to paint it. A painted concrete floor will be easier to clean...as long as you use the right type of paint. Floor and porch paint approved for concrete will help to seal the porous nature of concrete, and this will allow you to real get it clean.

Figure 4
Next, some consideration must be given to the walls and of course, the roof. The construction of these elements is somewhat ambiguous, so I am only going to generalize some of the various concerns here and let you take it from there. The best advice I can give you in a few words: "Think safety. Think practicality. And think durability". Try to avoid thinking in terms of budget as quite often people end up spending a dollar to save a dime in the longrun.
Starting with the walls, since you are going to be cleaning the shelter on a regular basis (hopefully) with water and other cleaning agents such as bleach and or ammonia, one can easily determine that water and conventional sheetrock are not a good match. The actual frame of the inner walls can still be wood - a piece of mudsill (pressure treated CCA - often known as Ground Contact wood) or cedar based sill are ideal. From the sill up, the wood can be standard 2" x 4" studs since they are going to be covered. In my opinion, the general framing of the shelter can be very similar to that used in framing houses. However, instead of using common sheetrock for the walls, I would recommend using Dur-Roc or Hardibacker board for the initial layer. These have proven to be very effective and moisture resistant. They are not going to easily mold or rot and also can be glazed with concrete or mortar mix, or painted. A person could also cover these, using a tile mortar mix, and apply the same type of material used in bathrooms to finish off the appearance of the walls.
If you plan on just leaving the walls unfinished, please know that Dur-Roc needs some type of adobe or cement glaze where the fibers of it will not show through. Dur-Roc is a very good medium, but it does wear over time and will need to be mended. Painting Dur-Roc with a high quality cement paint will help. Hardibacker on the other hand doesn't seem to wear as easily and can also be painted or glazed. The difference between the Dur-Roc and Hardibacker are pretty apparent. Cost is pretty apparent too. Hardibacker costs a bit more, and is also (at least for me) a bit tougher to cut and fabricate custom sized pieces. One trick I use in cutting either instead of using a knife, is to use a tile saw blade. A plywood blade turned around, also works well. Just be sure to wear safety glasses and a mask when cutting either of these products.
One point I must make here though is that when it comes to the mud sill portion of the wall, if you choose to use the peaked floor option, portions of the sill on the left and right need to accommodate the drainage system, if the trough is fabricated to the exterior of the shelter. If fabricated to have the trough on the inside of the walls, it is not a problem. "Why?" you ask would a person have the troughs on the outside and have holes in the sill, allowing cold air in? Simple. You are going to need to consider some type of ventilation into the construction of the walls/roof. A few holes in the sill will allow some amount of fresh air into the shelter and as most of us already know, heat rises. Any holes in the sill, if they allow too much cold air into the shelter, can easily be covered over with hay or straw until it is warm enough to uncover them.
In my opinion, the finished walls should be as smooth as possible, not allowing for the goats to get curious or bored, and to begin chewing or pawing on them. Goats are not going to be as likely to paw or chew on a concrete based wall as they would a sheetrock or wood based wall. There are just too many types of waterproof/water resistant wall choices to list them all. But a trip to your local hardware store and search through wall materials will point you in the right direction.
As I mentioned, providing some type of ventilation in the shelter is somewhat necessary. Is it required? No. But being able to have a moderate amount of air circulation is a good idea. It doesn't necessarily matter how or where you provide this ventilation, within practical reason of course. In the hot summer months, your goats won't be as likely to retreat to a shelter that is a sauna or sweatbox. A small ventilation on the roof the allows for fresh air to come into the shelter would be ideal. In the same manner, your goats won't be too thrilled in the winter when cold air is pouring in from a wide open door. Whatever method of ventilation you decide upon, keep in mind that being able to control ventilation no matter the weather outside, will give you a leg up on creating and maintaining a comfortable shelter environment year round.
Some last considerations on walls and electrical outlets. A few other construction considerations that shouldn't be overlooked and should be included in your final plans concern electrical connections (if you want to have power to your shelter) for things like lighting, heating and other things that will require power. Essentially what this means first is that you will need to have walls of a height so that you too, can easily access the shelter when needed. Since you are building this from the ground up so to speak, you have the option of creating walls that can accommodate electrical outlets higher than the goats can reach. You certainly don't want your goats to be able to chew on electrical wires. I personally would place any electrical outlets at or above a 6 foot level, or at the very least, higher than your tallest goat when standing on its hind legs can reach. If possible or prudent, mount outlet boxes into the ceiling of the shelter. From there, you can rig hooks or some type of system to accommodate electrical cords that can't be reached by the goats. Think ahead on this carefully before you proceed. A lot of fatal disasters have occured because the goats exploited potential safety hazards due to poor planning.
The roof of course is the final step in your goat shelter and it should be stated and understood, that any shelter is only as good as the roof. You don't neccessarily have to go all out and hot mop a roof with tar. Corrugated tin will work just as well, but you should construct your roof to avoid any potential leaks from rain, snow or blowing dirt. Also, don't forget to include plans for a roof ventilator if you decide that method to be best. Seal and insulate all potential cracks and crevices that present themselves. The product Great Stuff can go along way and help you in your efforts. I personally would recommend a peaked roof instead of a flat or sloped roof. There are a lot of great plans that can be found on the Internet for creating a peaked roof of this type. That being said, if you see a design you like, simply incorporate the ideas I've expressed here to customize the design for your goats.
In the next part of this article, I will begin discussing the remaining elements of being new to goats. Things such as purpose, feeding and health. And again, I am writing this article in the perspective that you are new to goats and are looking to get a good start. Until then, start planning and building and sending me your thoughts and comments as well as your goat shelter pictures!

|
About the author: Gary Pfalzbot is a Service Connected Disabled Veteran and the web master of GoatWorld as well as some other web sites. He has raised goats over the years, been involved with 4-H (as a young boy) and currently resides in Colorado where he and his wife Pam raise a few breeds of goats and other animals, and primarily author the GoatWorld web site to continue to inform, educate, and promote the industry.
|
|